Archaeologists interested in historic trades can learn much by practicing traditional crafts. Prehistorians are likewise indebted to 'experimental archaeologists' who have long studied the processes, behaviors, and materials of activities like flint knapping, butchering, copper smelting, salt boiling, and so on. My own research into the archaeology of Virginia's early 19th-century potters has opened my eyes to the thousands of clues hidden in potsherds, kiln waste, and potting sites that are only accessible to those who have practiced the craft and can recognize how these artifacts were created.
Before last year, I hadn't really tried to throw anything on the wheel since 7th or 8th grade. At that time, the whole concept was just beyond me. I remember having plenty of trouble getting the clay centered and then rarely (never?) surviving to make a shallow bowl. I think I produced one conical budvase/doorstop. As a result, I usually contented myself in middle school art classes with hand-building pieces like those below.
 |
| Early pottery- 5th and 7th grade or so |
Once or twice in college, I took a shot at throwing a bit of clay on an old record player I'd pulled the spindle out of. Although I managed a couple of tiny jars and even a little (3") ring bottle, centering the clay proved more a matter of chance than skill.
Well, a few years into my dissertation on 19th-century potteries, I began thinking seriously about learning to throw and in the spring of 2012, I was given the parts of an old wheel by a potter friend. The frame was long gone, the shaft and heavy kickwheel had actually spent the better part of a few decades at rest in the woods by his shop. A great piece of folk art in itself, the wheel began life as a flywheel on an early tractor. The broad steel rim that once carried a leather drive belt now served as the outer lip of a ring of cement. Cast between the rim and an inner brace of boards, the cement was inscribed "Luella's Own" and "Pat. Pending". Luella, it turned out, was the original owner. Her father had made the wheel for her and my friend had gotten it from them. That kickwheel became his first wheel and it served him well until he graduated to electric wheels.
 |
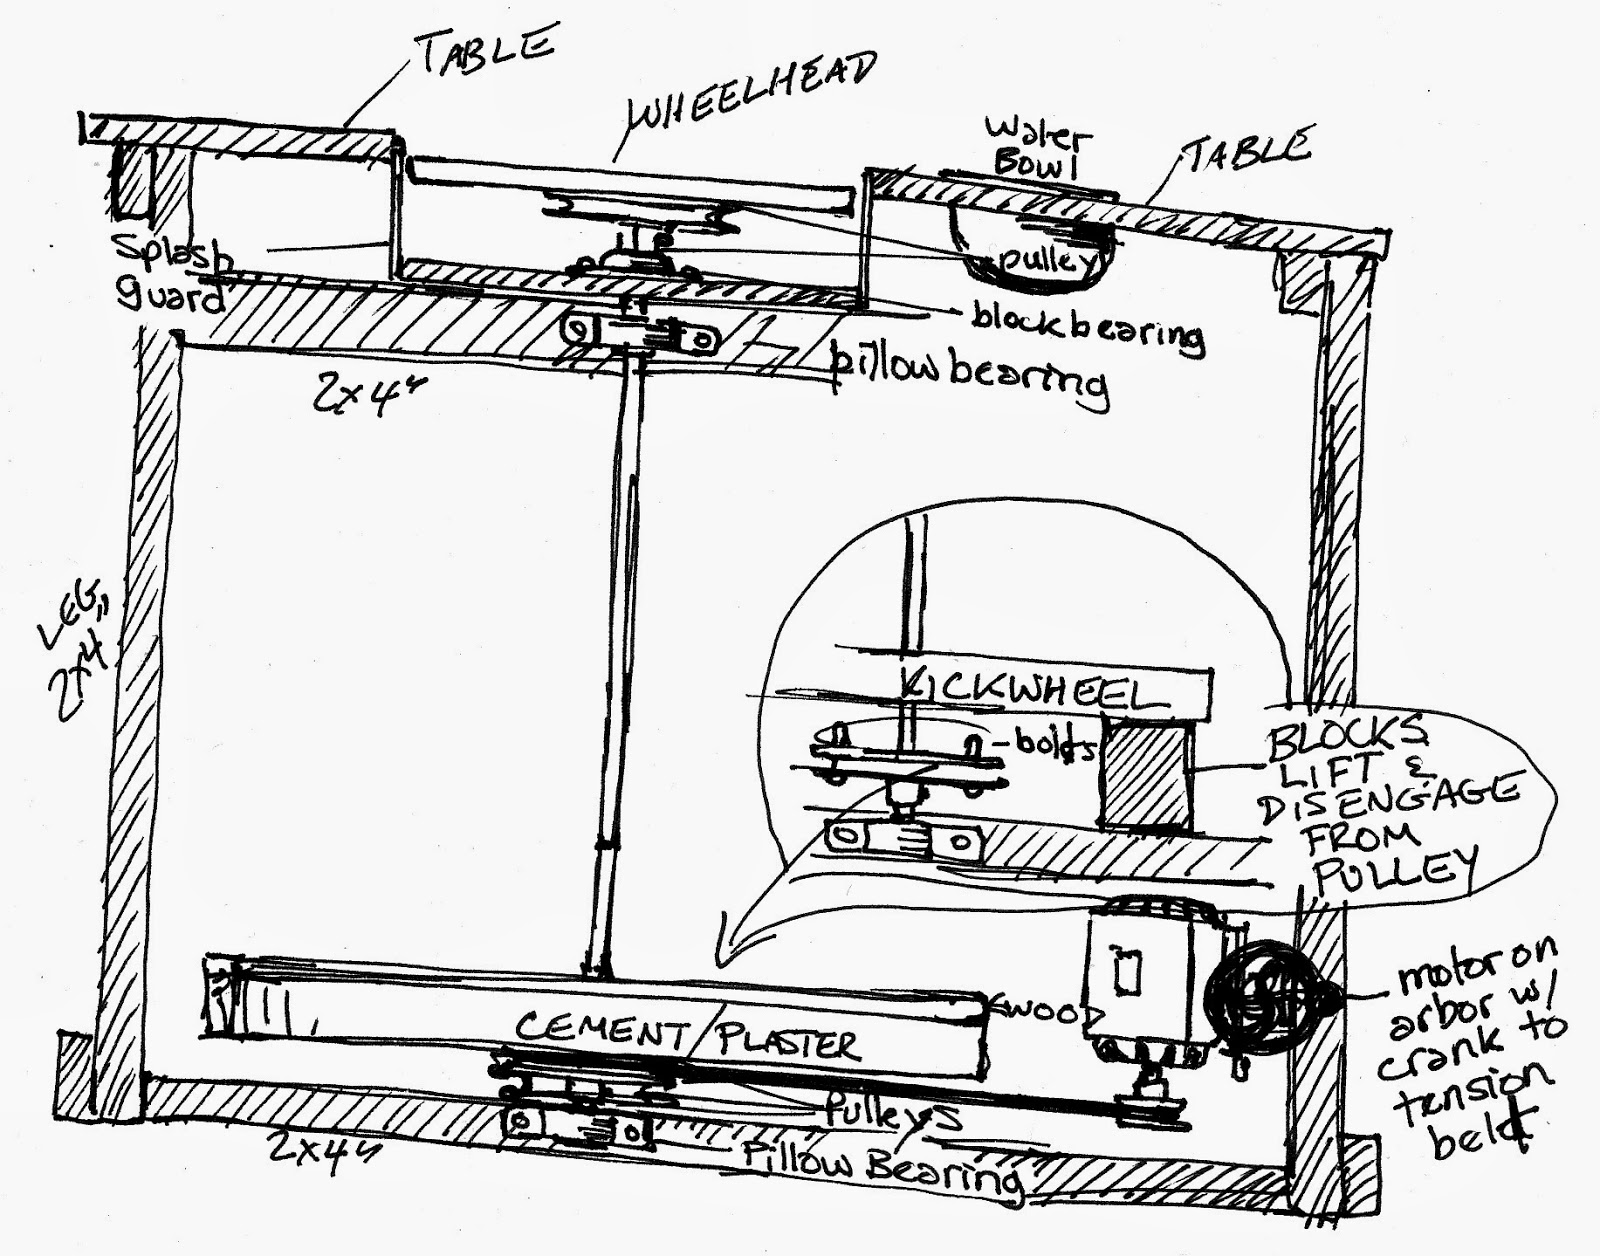
| Above: my first thoughts on building a combination electric/kick wheel using an old Packard electric motor I found and bearings, blocks, and pulleys from the hardware store. |
 |
| 'Luella's Own' kickwheel in the frame I began building in my kitchen. The wheel is designed to have a wooden deck bolted over the cement for extra traction. |
Excited to get it home and set up, I started making plans and tried to plot how best to rig it for my apartment. As with most of my projects, I promptly got into a couple snags- first, that the shaft was too low to accommodate my legs and second, that said shaft was fused in the bearing blocks by rust. After much tapping, hammering, and spraying of penetrating oils, I surrendered and took it to a local garage to press out the shaft. While the shop was closed over a weekend, I happened to see another wheel listed on Craigslist. More or less of an impulse purchase in the wake of my frustrations with the rusty shaft, the big steel studio treadle wheel came home the next day. It is a Klopfenstein treadle from Ohio, still made until recently, but this one probably dates to the early 1950s. There was rust to deal with here as well, but a couple of days with a wire wheel, sandpaper, and tractor enamel brought it back up to par. I did have to replace the treadle rod so I got a new steel rod at the local hardware store and cut the needed threads with a die. Naturally, the garage called back that the shaft for wheel Nr. 1 was freed the same day.
 |
| The treadle wheel comes home. |
 |
| Klopfenstein treadle wheel- cleaned up and ready to use. |
Well, progress on 'Luella' has been slow. I did throw a few pieces on it first while the frame was in mock-up stage but otherwise I've been using the treadle wheel. To be honest, in the year and a half since I began throwing, I haven't put in a month where I've practiced every day. Dissertation work and other projects got in the way- often quite literally as the two wheels became work surfaces and storage when not in use. Well, here's hoping that with the dissertation done I'll be able to make more time.
So, last spring and summer, I set out to teach myself how to throw. I had help of course- a number of books and some videos I'd made of demonstrations by potter friends Hal Pugh, Mary Farrell, and Michelle Erickson. I also got a lot of help watching online videos, particularly those of Simon Leach.
 |
| Ring jug thrown as an open, circular trough and closed in. I'm trying to balance learning basic forms like cylinders with learning about historic pottery forms but like apprentices of old, I would probably be better served to spend a year throwing nothing but candlesticks or cylinders. |
Clay for my throwing came from the ceramic supply shop in Richmond, but also from the 19th-century potting sites I was studying for my dissertation. I learned to dry the clay, crush it, soak and 'slake' it, screening to remove the twigs, roots, rocks, and tiny fossils. Like learning to throw and using the manual wheels, I wanted to get closer to the old time potters by learning how to process my own materials. I still have a long way to go with this and am looking forward to learning how to make glazes especially the cobalt oxide and manganese slips common in salt-glazed stoneware.
Within a month, I was much better at centering, controlling, and gaining a feel for the clay. After that my progress seemed to slow and I began getting distracted. New 'green' pots appeared on the shelves around the kitchen every few days, then only every few weeks. Often, it felt like I kept having the same troubles: thick bases and clay getting too wet and succumbing to cracking or slumping. Still, looking back, I have been able to throw larger balls of clay a little more confidently and I am sure more and steady practice with help.
 |
| The green ware piles up, despite not spending enough time on the wheel. As a beginner, I have kept more than I should, but I hope to use these to test a home-built kiln. |
 |
| Practicing making lids and jugs and making 'sprig' molds for decorations based on historic examples like the Bartmann masks at right. |
 |
| Bottle, mug, various small vessels, and a ring jug based on a 17th-century French earthenware example |
About a year ago, I also picked up an old electric kiln in the hope of converting it to burn gas as I had seen done online. I bought a pair of propane weed burners and removed the electric coils but have yet to pick up firebricks to make a flue and interior chimney for the downdraft design I'm aiming for. I could simply burn the kiln as an updraft, I know, but I'm interested in experimenting with the draft/flue patterns.
 |
| Old electric kiln, above, and sketches for conversion to gas, below. |
 |
| Some vintage potting tools including a bone rib. |
 |
| Plaster wedging block built from an old coffee table. Left leg holds a cutting wire tightened with turnbuckles. |


No comments:
Post a Comment