Friday, August 1, 2014

Smash Acts! "Jug Breakings" of the 1870s and beyond


 In the 1870s, America experienced a curious revival of the old English moneybox tradition. The moneybox, or ‘money jug’ as it was known here, became the feature attraction of a popular fundraising event, the “Jug Breaking”. Weeks or months before a set date, children were given small earthen ‘jugs’ with no opening save for a coin slot and sent out into the community in search of donations. The Breaking itself often consisted of a program of various entertainments such as singing and storytelling, music and talent shows, punctuated by the breaking of the jugs. At the close of the evening, the coins were counted and the top collectors received prizes for their efforts. Jug breakings proliferated in the last quarter of the 19th century, generating considerable funds for church buildings, libraries, fraternal orders, teachers’ salaries, and even missionary work around the world. As might be expected, the tradition also had strong ties to the temperance movement. Although its heyday appears to have been from the late 1870s to the early 1900s, Jug Breakings continue to be held to this day in a few churches.  I have explored these and other aspects of  these 'smash acts' in a forthcoming article.

The vessels used at Breakings were often of a specific form, produced in bulk by yet-to-be identified potteries. Here are a few the jugs- note the slight differences in shape, handles, and necks. Several accounts describe jugs being painted (generally brown but sometimes gold) and lettered or tagged with the names of children.

Sources for this research come from American and Canadian newspapers, chiefly of the 1870s to 1920s, from Ontario to Florida and from Maine to Hawaii!


Sunday, January 5, 2014

First Firing in the Converted Gas Kiln


Pots in the kiln- some with homemade ash glaze made from red and yellow clays found on the property and hickory ashes from the fireplace. I dusted a few more ashes on them just to see what it would do by itself.

Kiln as it was set up for first firing. Always check propane connections for leaks with a bit of soapy water.
           With only a half a day drying time for the pieces I’d dipped in the ash glaze, I started the firing at 1 o’clock at very low flame, just enough to keep the torches from going out. About two hours later, I turned it up to a strong yellow flame and an hour on, to a loud blue flame. I heard no cracking or pinging from inside the kiln so everything seemed to be doing fine.

Warming up on low flame- 2 hrs
Turned up to halfway on the torches. The pipe elbow bottled up a lot of heat and probably restricted the flow despite the height of the chimney. Also, torches needed more room but backing them out made the flame erratic (I enlarged the holes for the next firing attempt).

After the 15lb tanks ran out, I increased the pressure on the 40lb one and tried to seal the second fire port with a brick. I turned it back again pretty quick...
          I had hoped to see cone 6 bending after four hours or at least five hours but the kiln seemed to level off and the small propane tanks kept running strong. Well, strong, they weren’t- the pressure change was so gradual that it wasn’t till I kicked one in the dark that the contents momentarily pressurized and suddenly the torches reminded me how loud they had been at first. I went ahead and shut off the right tank and unscrewed the line, substituting the new 40 lb. tank and relighting. All seemed to going well again and I alternated between reading in a chair by the kiln and carrying red bricks over to make a floor around the kiln to keep rain runoff away. Despite getting strong reduction flames out the chimney and later out every crevice in the lower 2/3s of the kiln, the cones all remained standing straight by 10pm (9 hours in) at which time I gave up and cut the valves to half and then off completely after 30 minutes. Total gas used was a little under 5 gallons from the 40lb. tank and 7 gallons between the two 15 lb. ones, so 12 gallons all told.

          I waited until the next afternoon to open the kiln and see how the pots had fared. The result was as expected; they were all well-bisqued but the ash glaze was just a dry flaky crust and the pure ash I’d dusted the rims with looked like burnt coffee grounds. The latter could be wiped off leaving a lightly brown stain.

         Well, that's the nature of experiments. Next- to figure out why it wasn't making it higher.

Ash Glaze

Left to right: fireplace wood ashes, screen made from bucket rim and lid to screen ash and clay, clay from creek on site.


         While waiting for the pyrometric cones to come in the mail, I decided to make use of the fireplace full of high alkali hickory ash by trying to mix up some ash glaze. 

            I dug some gray/yellow clay from the creek on the property and also some high-iron red clay from among the roots of an toppled oak near the kiln. I made a sieve from window screen and the rim and lid of a 5-gallon bucket. Next, I went about sifting the charcoal and debris from the ashes and cleaning the clays. There wasn’t time to dry out the clay but I slaked it, screened it, and tried to guess at the dry weight so I could make something like a 50/50 ash and clay mixture. In the end, both came out pretty rough- no matter how much I stirred, they still would have benefited from a finer screen. I have since gotten a fine screen (100 mesh) and have been able to mix more ash glaze at a consistency that won't clog a spray bottle.  As it was, I dipped some pieces in the ash-slip and brushed it on others. This is all just a first experiment so plenty to learn!

Bug 'pottery'! (clay-lined insect tunnels from inside the firewood that was burned and fired along with the pots)
Screened ashes- still pretty coarse...
But this is the stuff that really shouldn't be in the glaze! Charcoal, twigs, nutshells... you name it.


Electric to Gas Kiln Conversion


           Well, I finally made it out to get things on the gas kiln shopping list- propane, sabersaw blades, stovepipe, and firebrick. Two barbeque tanks from Sheetz and a narrow stovepipe with elbow, rectangular flange, hood/cap, and screw clamps came back in the car. A phone call and a drive to a local brickyard turned up forty heavy firebricks rated to 2500 degrees Fahrenheit.After warnings from friends that I'd need more fuel, I picked up a 40lb propane tank from Tractor Supply (I eventually tried to get a second but no luck- and I wish I'd been able to).

Electrical elements pulled out of the sides.
           Back at the farm, I cut the two torch holes in the bottom ring of the old electric kiln, then the slot between them for the exhaust/chimney. I tried to make the latter hole equal to the former two combined to balance the draft. I had already cut the old heating elements at the ceramic plugs in the wall and removed them- several broke on the way out, despite trying to be gentle. The straight pieces of wire that secured the elements were pulled as well. Next, I assembled and test-fitted the chimney, drilling a hole through the stovepipe about halfway for a piece of threaded rod. The rod had a nut at one end to hold it in a spring that was attached to the kiln’s lid hinge. The other end passed through the chimney and was secured with a wingnut.

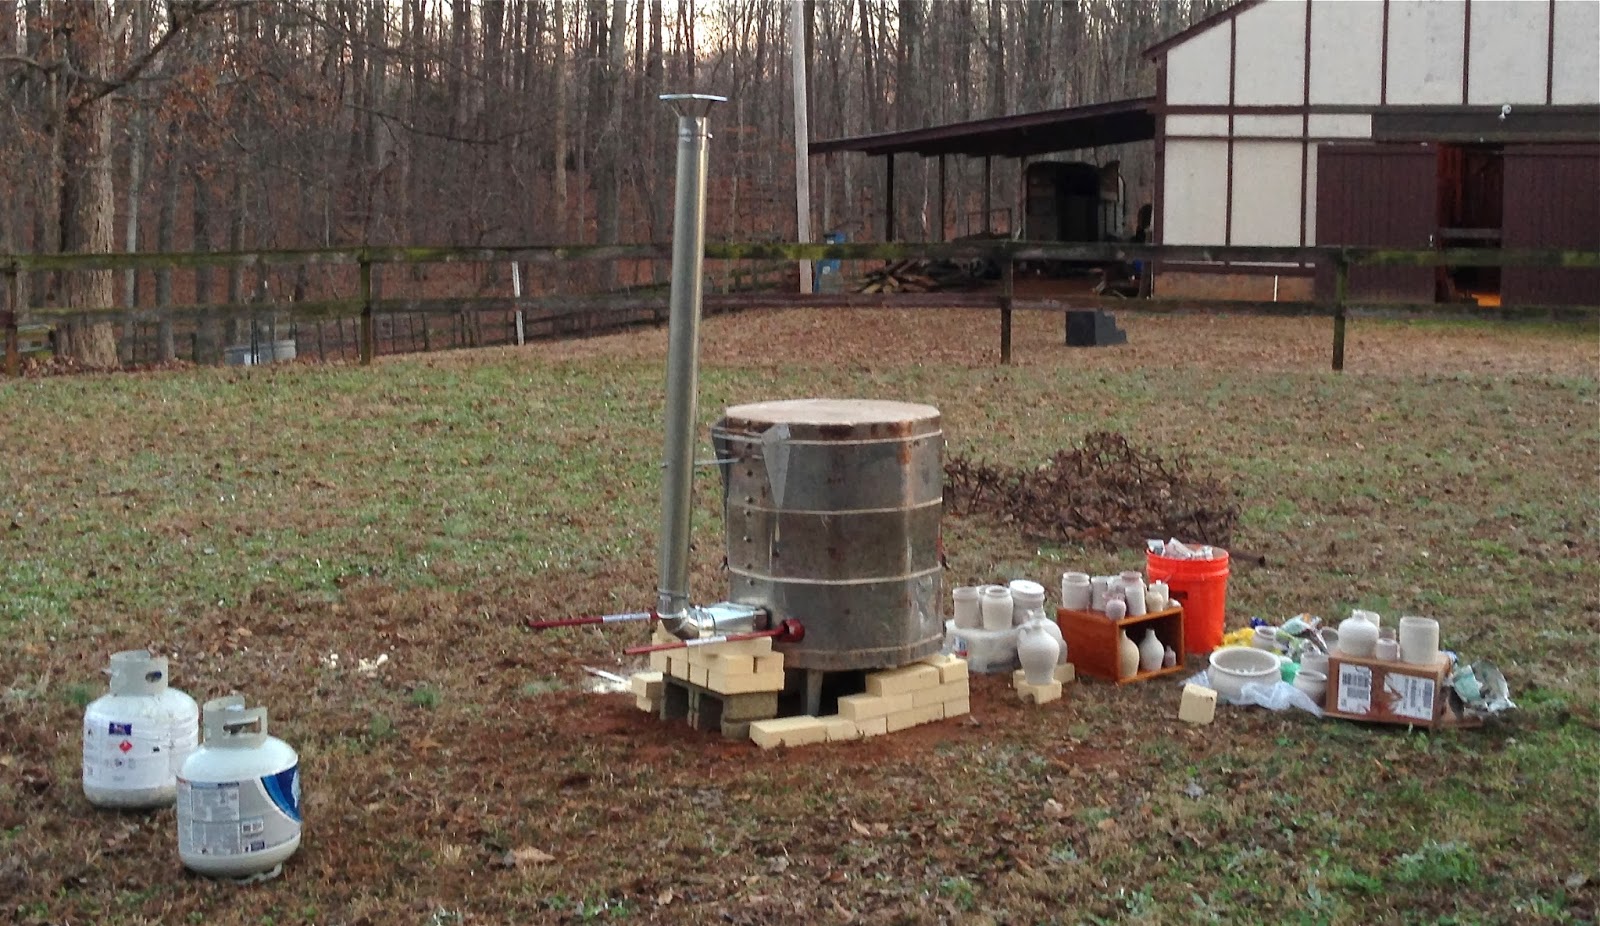
Torches and stovepipe placement. Torches needed to be suspended outside the kiln so they could get enough air
           I carried the kiln sections, chimney, and bricks over to the ca. 80’ sand ring nearby and began to set it up in the center. I dug pockets into the sand down to the red clay below to seat four bricks that would give the kiln’s steel stand a stable footing. With all the fall leaves cleared from the ring, I set up the floor, rings, and lid, then added a cinder block behind and attached the chimney. The block would support the stovepipe and torches. The firebricks would hold the torches but I didn’t make them into a chimney, wanting to see how well the pipe worked first.

First incarnation, minus gas hoses.
           With rain forecast for the next day and a package of Seger cones only due to arrive the day after, I found four old 4x4s and some boars and rigged a simple frame over the kiln, eight feet high. This I covered with three sheets of galvanized tin roofing after another run to Lowes. I left the sheets loose in case the heat got too high and I needed to pull it off but the stovepipe didn’t do much more than warm the boards in the end.

           Kiln packing was simple as this was mostly to be a bisque firing- I stacked the more fragile and smaller things inside the larger, and made sure to turn jugs and other handled forms so their handles pointed inward, out of the direct path of flames. I threw some play sand between the nested pieces and tried to keep the like-clays together lest things get stuck together/melt. I had pieces made from five different clay sources in the kiln, several of which I dug myself, so I didn’t know what to expect. 


Kitchen Potting: Out of the Kitchen and Into the Fire


           The holidays found me down in North Carolina, where I left the old electric kiln I picked up off of Craigslist. Finally some time to tackle the electric to gas conversion! I brought along a few boxes of dried pots packed in newspapers for a test firing.

           Well, I was unable to make it to the store to get kiln-building supplies for a few days, so I impatiently stashed a batch of pots under the grate in the house fireplace and started firing with wood. The pots were all at least a few months dry and the hickory fire provided a fairly gradual warmup. 
 
 
          I kept adding a log or two every half hour and raking the embers around the pots till they were nested in about 6 inches of ash and coals. After five hours, I let the fire die down and the next morning, I pulled out a couple bisqued pieces and a number of not-so-hard examples (those that sat around the outside edges). I rotated the latter to the inside and went ahead and fired again, adding a few extra pots, with about the same results. The center area (ca. 10 by 6 inches) under the grate made it to bisque temperatures but fell off sharply on all sides- pretty much what you’d expect.

My first 'firing'!
Second Batch
Traveling marmot Ferdinand unpacking the fireplace kiln- three or four different clay bodies here.