Friday, August 1, 2014
Sunday, January 5, 2014
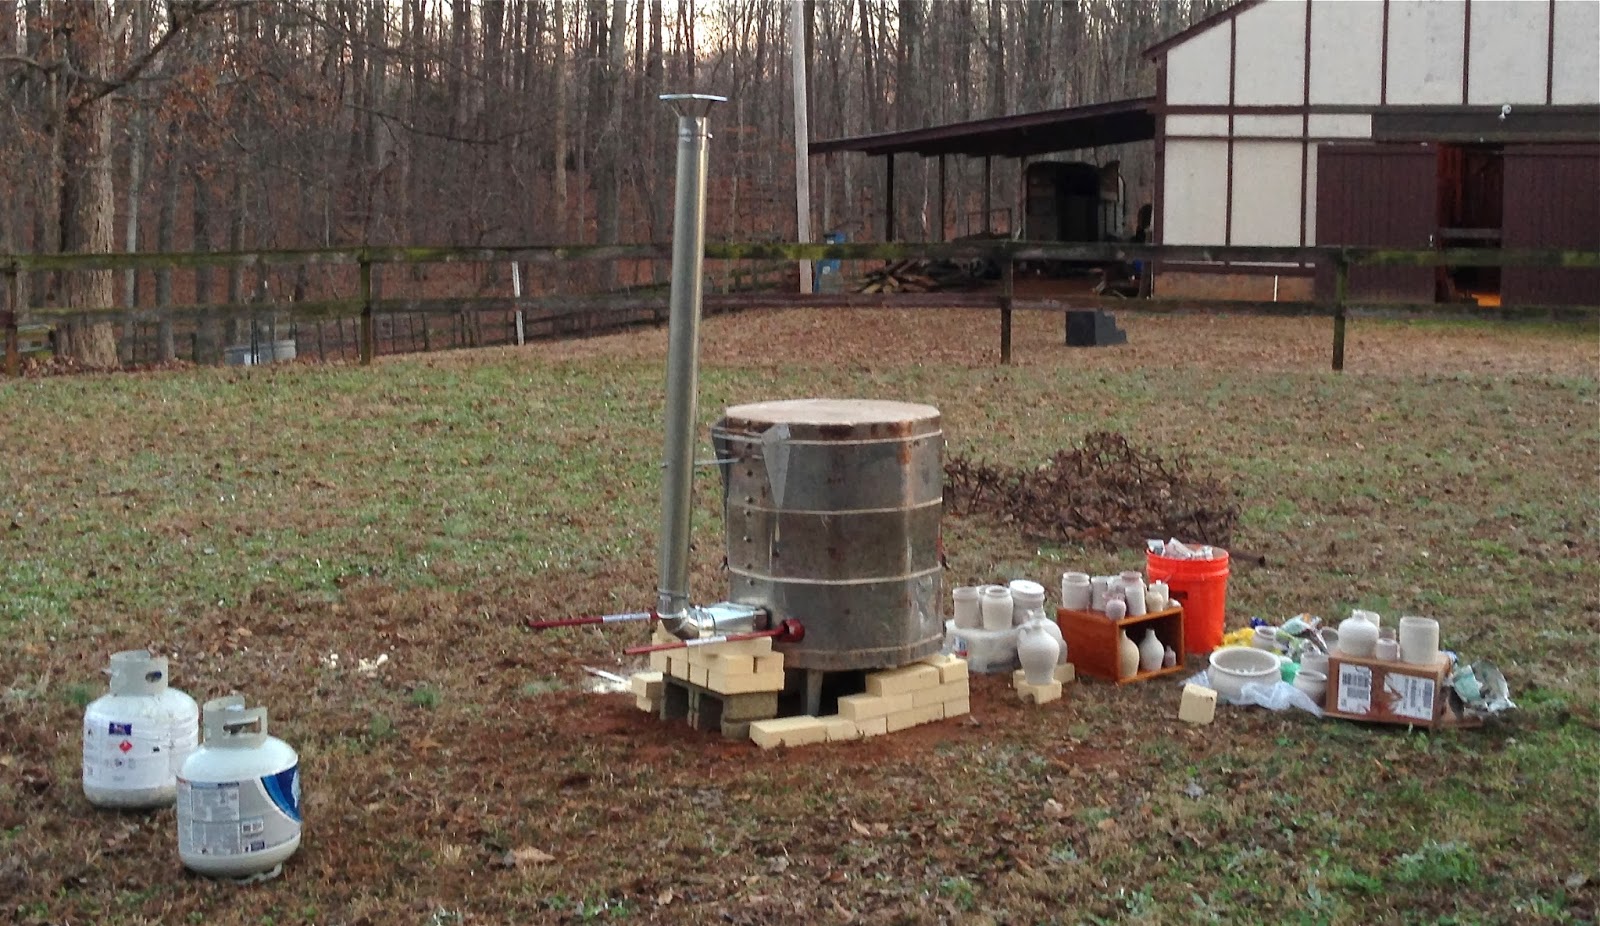
First Firing in the Converted Gas Kiln
![]() |
| Kiln as it was set up for first firing. Always check propane connections for leaks with a bit of soapy water. |
With only a half a day drying time for the pieces I’d dipped
in the ash glaze, I started the firing at 1 o’clock at very low flame, just
enough to keep the torches from going out. About two hours later, I turned it
up to a strong yellow flame and an hour on, to a loud blue flame. I heard no
cracking or pinging from inside the kiln so everything seemed to be doing fine.
| Warming up on low flame- 2 hrs |
![]() |
| After the 15lb tanks ran out, I increased the pressure on the 40lb one and tried to seal the second fire port with a brick. I turned it back again pretty quick... |
I had hoped to see cone 6 bending after four hours or at
least five hours but the kiln seemed to level off and the small propane tanks
kept running strong. Well, strong, they weren’t- the pressure change was so
gradual that it wasn’t till I kicked one in the dark that the contents
momentarily pressurized and suddenly the torches reminded me how loud they had
been at first. I went ahead and shut off the right tank and unscrewed the line,
substituting the new 40 lb. tank and relighting. All seemed to going well again
and I alternated between reading in a chair by the kiln and carrying red bricks
over to make a floor around the kiln to keep rain runoff away. Despite getting
strong reduction flames out the chimney and later out every crevice in the
lower 2/3s of the kiln, the cones all remained standing straight by 10pm (9
hours in) at which time I gave up and cut the valves to half and then off
completely after 30 minutes. Total gas used was a little under 5 gallons from
the 40lb. tank and 7 gallons between the two 15 lb. ones, so 12 gallons all
told.
I waited until the next afternoon to open the kiln and see
how the pots had fared. The result was as expected; they were all well-bisqued
but the ash glaze was just a dry flaky crust and the pure ash I’d dusted the
rims with looked like burnt coffee grounds. The latter could be wiped off
leaving a lightly brown stain.
Well, that's the nature of experiments. Next- to figure out why it wasn't making it higher.
Ash Glaze
| Left to right: fireplace wood ashes, screen made from bucket rim and lid to screen ash and clay, clay from creek on site. |
While waiting for the pyrometric cones to come in the mail, I decided to make use of the
fireplace full of high alkali hickory ash by trying to mix up some ash glaze.
I
dug some gray/yellow clay from the creek on the property and also some
high-iron red clay
from among the roots of an toppled oak near the kiln. I made a sieve
from window screen
and the rim and lid of a 5-gallon bucket. Next, I went about sifting the
charcoal
and debris from the ashes and cleaning the clays. There wasn’t time to
dry out
the clay but I slaked it, screened it, and tried
to guess at the dry weight so I could make something like a 50/50 ash
and clay
mixture. In the end, both came out pretty rough- no matter how much I
stirred,
they still would have benefited from a finer screen. I have since gotten
a fine screen (100 mesh) and have been able to mix more ash glaze at a
consistency that won't clog a spray bottle. As it was, I dipped some pieces in the ash-slip and brushed it on others. This is all just a first experiment so plenty to learn!
| Bug 'pottery'! (clay-lined insect tunnels from inside the firewood that was burned and fired along with the pots) |
| Screened ashes- still pretty coarse... |
| But this is the stuff that really shouldn't be in the glaze! Charcoal, twigs, nutshells... you name it. |
Electric to Gas Kiln Conversion
Well, I finally made it out to get things on the gas
kiln shopping list- propane, sabersaw blades, stovepipe, and firebrick. Two
barbeque tanks from Sheetz and a narrow stovepipe with elbow, rectangular
flange, hood/cap, and screw clamps came back in the car. A phone call and a
drive to a local brickyard turned up forty heavy firebricks rated to 2500
degrees Fahrenheit.After warnings from friends that I'd need more fuel, I picked up a 40lb propane tank from Tractor Supply (I eventually tried to get a second but no luck- and I wish I'd been able to).
![]() |
| Electrical elements pulled out of the sides. |
Back at the farm, I cut the two torch holes in the bottom
ring of the old electric kiln, then the slot between them for the
exhaust/chimney. I tried to make the latter hole equal to the former two
combined to balance the draft. I had already cut the old heating elements at
the ceramic plugs in the wall and removed them- several broke on the way out,
despite trying to be gentle. The straight pieces of wire that secured the
elements were pulled as well. Next, I assembled and test-fitted the chimney,
drilling a hole through the stovepipe about halfway for a piece of threaded
rod. The rod had a nut at one end to hold it in a spring that was attached to
the kiln’s lid hinge. The other end passed through the chimney and was secured
with a wingnut.
![]() |
| Torches and stovepipe placement. Torches needed to be suspended outside the kiln so they could get enough air |
I carried the kiln sections, chimney, and bricks over to the
ca. 80’ sand ring nearby and began to set it up in the center. I dug pockets
into the sand down to the red clay below to seat four bricks that would give
the kiln’s steel stand a stable footing. With all the fall leaves cleared from
the ring, I set up the floor, rings, and lid, then added a cinder block behind
and attached the chimney. The block would support the stovepipe and torches. The
firebricks would hold the torches but I didn’t make them into a chimney,
wanting to see how well the pipe worked first.
| First incarnation, minus gas hoses. |
With rain forecast for the next day and a package of Seger
cones only due to arrive the day after, I found four old 4x4s and some boars
and rigged a simple frame over the kiln, eight feet high. This I covered with
three sheets of galvanized tin roofing after another run to Lowes. I left the
sheets loose in case the heat got too high and I needed to pull it off but the
stovepipe didn’t do much more than warm the boards in the end.
Kiln packing was simple as this was mostly to be a bisque
firing- I stacked the more fragile and smaller things inside the larger, and
made sure to turn jugs and other handled forms so their handles pointed inward,
out of the direct path of flames. I threw some play sand between the nested
pieces and tried to keep the like-clays together lest things get stuck
together/melt. I had pieces made from five different clay sources in the kiln, several
of which I dug myself, so I didn’t know what to expect.
Kitchen Potting: Out of the Kitchen and Into the Fire
The holidays found me down in North Carolina, where I left the old electric kiln I picked up off of Craigslist. Finally some time to tackle the electric to gas conversion! I brought along a few boxes of dried pots packed in newspapers for a test firing.
Well, I was unable to make it to the
store to get kiln-building supplies for a few days, so I impatiently stashed
a batch of pots under the grate in the house
fireplace and started firing with wood. The pots were all at least a few months
dry and the hickory fire provided a fairly
gradual warmup.
I kept adding a log or two every half hour and raking the
embers around the pots till they were nested in about 6 inches of ash and
coals. After five hours, I let the fire die down and the next morning, I pulled
out a couple bisqued pieces and a number of not-so-hard examples (those
that sat around the outside edges). I rotated the latter to the inside and went ahead and fired again, adding a few extra pots, with about the same results. The
center area (ca. 10 by 6 inches) under the grate made it to bisque temperatures
but fell off sharply on all sides- pretty much what you’d expect.
| My first 'firing'! |
| Second Batch |
| Traveling marmot Ferdinand unpacking the fireplace kiln- three or four different clay bodies here. |
Wednesday, December 25, 2013
Past, Present and Future
A message from Charles Dickens this Christmas morning. Heritage is our business. Mankind is our business.
"I will live in the Past, the Present, and the Future. The Spirits of all Three shall strive within me. I will not shut out the lessons that they teach" -Ebenezer Scrooge
Wednesday, December 18, 2013
Bowls to Buckets: Part 2
First looks can be deceiving. Another visit to the little site with the Model T and the stone foundation has called for some revisions.
The foundation, it turns out, is a full set of eight stone piers. Whether a side was left open is hard to tell. The measurements of the building are still small, only 3x4 meters or roughly 10x13 feet. Tin roofing close by probably once covered it and, to judge by a shovel test dug alongside, it had glazed windows. The shovel test also included cut and unidentifiable nails or other iron and a large bottle fragment.
The site is still a mystery as to purpose. To the Model T, the crosscut saw, and enamelware, I can now add a plow blade and an unidentified bottle (I first guessed Karo Syrup, but no matches have been forthcoming).
Oh, and this is the sort of thing that punched the holes in the Model T:
So, got a chance to refine the layout a bit but haven't learned much more about the place. The relationship of the building to the well/privy/hole feature is interesting. The latter is slightly uphill and in line with one side of the structure while a long ditch aligns with the opposite end.
Other than the brief return to Ford country, the survey area has produced nothing of note. This Sprite can was about it as far as non-shrapnel finds:
Basically very little to report. Still, all in all, fine weather, cold and clear and always something to investigate. Here are a few more general shots from the woods:
SOURCES:
Sprite/Fanta:
http://en.wikipedia.org/wiki/Fanta
The foundation, it turns out, is a full set of eight stone piers. Whether a side was left open is hard to tell. The measurements of the building are still small, only 3x4 meters or roughly 10x13 feet. Tin roofing close by probably once covered it and, to judge by a shovel test dug alongside, it had glazed windows. The shovel test also included cut and unidentifiable nails or other iron and a large bottle fragment.
The site is still a mystery as to purpose. To the Model T, the crosscut saw, and enamelware, I can now add a plow blade and an unidentified bottle (I first guessed Karo Syrup, but no matches have been forthcoming).
![]() |
| Any ideas? It is a quart-size, straight-sided bottle, originally with a paper label covering the lower half (this based on the strong horizontal line). The glass has a fair number of bubbles. |
So, got a chance to refine the layout a bit but haven't learned much more about the place. The relationship of the building to the well/privy/hole feature is interesting. The latter is slightly uphill and in line with one side of the structure while a long ditch aligns with the opposite end.
Other than the brief return to Ford country, the survey area has produced nothing of note. This Sprite can was about it as far as non-shrapnel finds:
Basically very little to report. Still, all in all, fine weather, cold and clear and always something to investigate. Here are a few more general shots from the woods:
| Fallen oak. This pancake root structure made a lot of the surrounding area a pain to dig. |
Sprite/Fanta:
http://en.wikipedia.org/wiki/Fanta
Thursday, December 12, 2013
Back in the Woods: Bowls to Buckets
Laying in survey lines today brought us to a new site along yet another old road in the woods.
Here and there, enamel bowls poke out among the leaves. These bowls always manage to survive, generally with a few rusty holes, but otherwise recognizable. This, when nothing remains of a home but a few bricks and old iron. Known as graniteware, speckled ware, or agateware, the popular kitchen and bath goods came in dozens of colors. Patented over 150 years ago, their popularity peaked in the late 1800s through the 1930s when lightweight aluminum took their place (we still encounter a few examples today, often in the form of camping dishes and cups). Designs in the heyday included speckling, marbleizing, and solids, sometimes with prints. Many of the examples we come across on surveys are common blues, grays, whites, and greens.
The bowls are not the only above-ground remains here, a three-sided fieldstone box marks the footprint of a small building. It seems quite small for a house and the open west side suggests a shed of some kind. Behind it, ferns encircle a 5-foot, leaf-filled depression. An iron framework from a piece of machinery with two ratcheting gears, similar to a small manure spreader, pokes out of the leaf mold in between.
![]() |
| Mystery depression- perhaps a well or privy |
| Remains of a piece of equipment |
![]() | |
| Small frame structure- may have been an open shed, judging by the stones on which it sat. Some of the stones, like that on the right, were more regularly cut. |
One more small item lay down slope from the foundations, a 6 oz. graduated medicine bottle with a black bakelite screw cap. The late 1920s-1930s art deco style bottle bears on its base the script 'Rexall'.
Rexall (rex from the 'rx' abbreviation of 'prescription) was the first nationally licensed drugstore chain. Spanning 1902 to 1977, it peaked in the 1920s-1950s with only slightly fewer independent Rexall drugstores than there are McDonald's restaurants today.
![]() |
| Look for the orange and blue sign and stop in to see your neighborhood Rexall Druggist. Good Health to all, From Rexall! |
Although most of the small parts and engine are gone, it appears all the fenders, doors, and hood are there among the leaves. This car, for one, seems to have managed to find a place on base to rest in peace (yes..a few bullet holes, but still!).
And what is it? Well, Ford folks can correct me if I'm wrong, but it looks to be about a 1925-27 Model T roadster pickup.
![]() |
| The roadster body (aka T-bucket to the hot rod crowd) with the open frame in the back and this arrangement of holes in the rear corners probably make this a pickup. |
![]() |
| Ford Model T Roadster Pickup. Image: gomotors.net |
Of course, there are other things lying around in the woods. It isn't every day you come across a crashed helicopter. But that's another story...
Sources:
Cross-cut Saws
http://northernwoodlands.org/articles/article/using_a_crosscut_saw
Rexall:
http://en.wikipedia.org/wiki/Rexall
Model T:
http://www.howstuffworks.com/1923-1927-ford-model-t5.htm
http://gomotors.net/Ford/Ford-Model-T-Roadster-Pickup/photos.html?pic=4
Wednesday, December 11, 2013
Chasing the Wild Motel: Princess Anne Motor Lodge, Williamsburg
The Princess Anne Motor Lodge, Williamsburg, VA
![]() |
| Early 1950s |
![]() |
| late 1950s |
![]() |
| 1964 |
The Princess Anne was built at the southeast corner of Richmond Road and New Hope Road around 1946. Although it seems relatively small from the street, the complex extends back via a loop road. According to period postcards, "40 Units with air conditioning and radiant heat"
offered "quiet, immaculate accommodations, the latest in motor court comfort and
convenience" and carried recommendations from the American Automobile Association, Duncan Hines, and Superior Courts United, Inc.
While the buildings were originally red brick, they were painted cream sometime before 1964. While I have not had much time to research the lodge's history, newspaper articles tell us that Margaret Burgess McMillan, wife of Allan Paul McMillan, was its general manager until 1986 (Dec 31, 1986 Richmond Times Dispatch, p.3).
I stayed at the Princess Anne around ten years ago and found it charming and well-kept, a surprisingly intact mid-century motel. The cream-painted brickwork, flower beds, large trees, and green lawn became one of my favorite sites along Route 60, a roadside landscape increasingly fallen prey to chain development.
Around 2007, the name was changed to "Heritage Inn"and the Princess herself was repainted in the style of Public Television's Revolutionary War cartoon series "Liberty's Kids". The 'Inn' now serves as an apartment complex rather than a hotel and, in 2010, the owner was required to remove the sign which had stood at the entrance for half a century. A storm also toppled the great tree on the right-hand side of the office, causing damage to the eaves and gutter. The Princess has been having a rough few years.
![]() |
It is my hope that this will not be the end of the Princess Anne and that efforts can be made to rebuild and restore one of Williamsburg's classic motor courts. Businesses like the Princess Anne and the handful of survivors on the other side of town (e.g. the White Lion and International Village) were at the heart of Colonial Williamsburg's growth and success in its early years and remain relatively intact. They deserve preservation.
Sources:
Tuttle, Jackson C.,2011 Williamsburg City Manager Memorandum to Mayor and City Council: 6 Oct. 2011
"Purchase Of Property At 901 Capitol Landing Road":
http://williamsburg-va.granicus.com/MetaViewer.php?view_id=2&clip_id=129&meta_id=4026
1964 Kodachrome detail:
http://www.flickr.com/photos/rbglasson/4211055884/
Photos by author and postcards in author's collection.
News stories relating to the wreck:
http://www.wavy.com/news/local/7-displaced-when-car-crashes-into-motel
http://www.youtube.com/watch?v=mz67K9VUN88
* Chasing the Wild Motel image by Tom Funk accompanied an article in the September 1953 issue of Women's Day.
Subscribe to:
Posts (Atom)